Tips for Creating Composites
“For every minute spent organizing, an hour is earned.”
Tips I’ve learnt along the way
I often get asked “how long does it take for you to create a composite image”. Take away learning the skills in Photoshop, here are some tips I have learnt along the way that speed up my workflow.
It strikes or it doesn’t !
Firstly, there is the “creative mood” which strikes at any time, and you want to create a composite image OR the “mojo” is missing and “you are not feeling it”. What can you do? I have a few strategies I have learnt that still keeps my mind in the game, I’m still productive and doing the groundwork for when that “creative mood” strikes.
It is like “housekeeping duties” for the creative.
Lessons learnt
When I first started creating composite images. I spent hours looking through my photos for the right element (tree, building etc) then I had to learn how to extract that element from the photo, this involved “select and mask” techniques, which is the fundamental of creating composites. It was “find and learn as you go” mode.
Which made the creative journey frustrating yet exciting. It also made me realise the key was to get organised.
Getting organised
◼ Being a composite creative I am looking for backgrounds or elements to create a composite image when the mood strikes.
◼ I have thousands of photos taken over the years, landscapes, trees, buildings, sky’s, objects like lamps, letterboxes you name it these photos have been sitting in the archives doing nothing, just waiting to come out of hiding.
◼ The secret is to get your “stock library” organised so you can find things easily when you have an idea. How do you do this? Over the years I have been organising my “stock library” by finding a system that works for me, it has been a few years in the making. I use Lightroom to do this, but you can use other applications, the key is getting it organised that works for you. I have created folders for trees, buildings, flowers and so on, I will also add keywords to the photos.
◼ For example, I want an abandoned building to put in one of my backgrounds, I can easily search for Abandoned buildings in Lightroom by the different ways that I have set up, that works for how my brain thinks to find something.
◼ I will regularly look through my photos and find “gems” I have forgotten about and then put them into a place where I can find it when I need it. For example, the other day, I found a photo of suitcases taken years ago, and there was an old tin trunk I thought I can use this. This photo was collecting dust I am sure, I put it into a folder, added a keyword, so I could find it again when I need it for a composite image.
You have found a “gem”

◼ Sometimes, I don’t feel like creating an image, but want to play and keep my “select and mask” Photoshop skills working (the longer you don’t play the harder you have to work at something to get back into the game).
◼ What do I do then? I find a photo that I could use, let’s say the tin trunk, I cut it out already to place in a composite image. I have cut out trees, buildings, doors, windows, letterboxes, animals, birds whatever and have been gradually building up my “cut out” stock library.
◼ The benefit? I have the tools ready to use when an idea strikes or I’m not sure what I want to create and by searching my “stock library” and my “cut out” stock library it can spark an idea or speed up my workflow. Think of it like a trade person, they need the tools to do a job so they get a toolkit together, it is the same for a composite creator. Time spent getting organised and cutting out elements, saves you time down the track and you just can concentrate on being creative.
Saving the Elements
◼ Once I have cut out the elements, I save them in a PSD format with the mask attached, this way I can easily add them into my composite image, and having the mask attached makes it easy to blend the image into the background by brushing in and out mask areas.
◼ I have a Photoshop Training Video on Selecting and Masking techniques.
“Cut Out” Stock Library
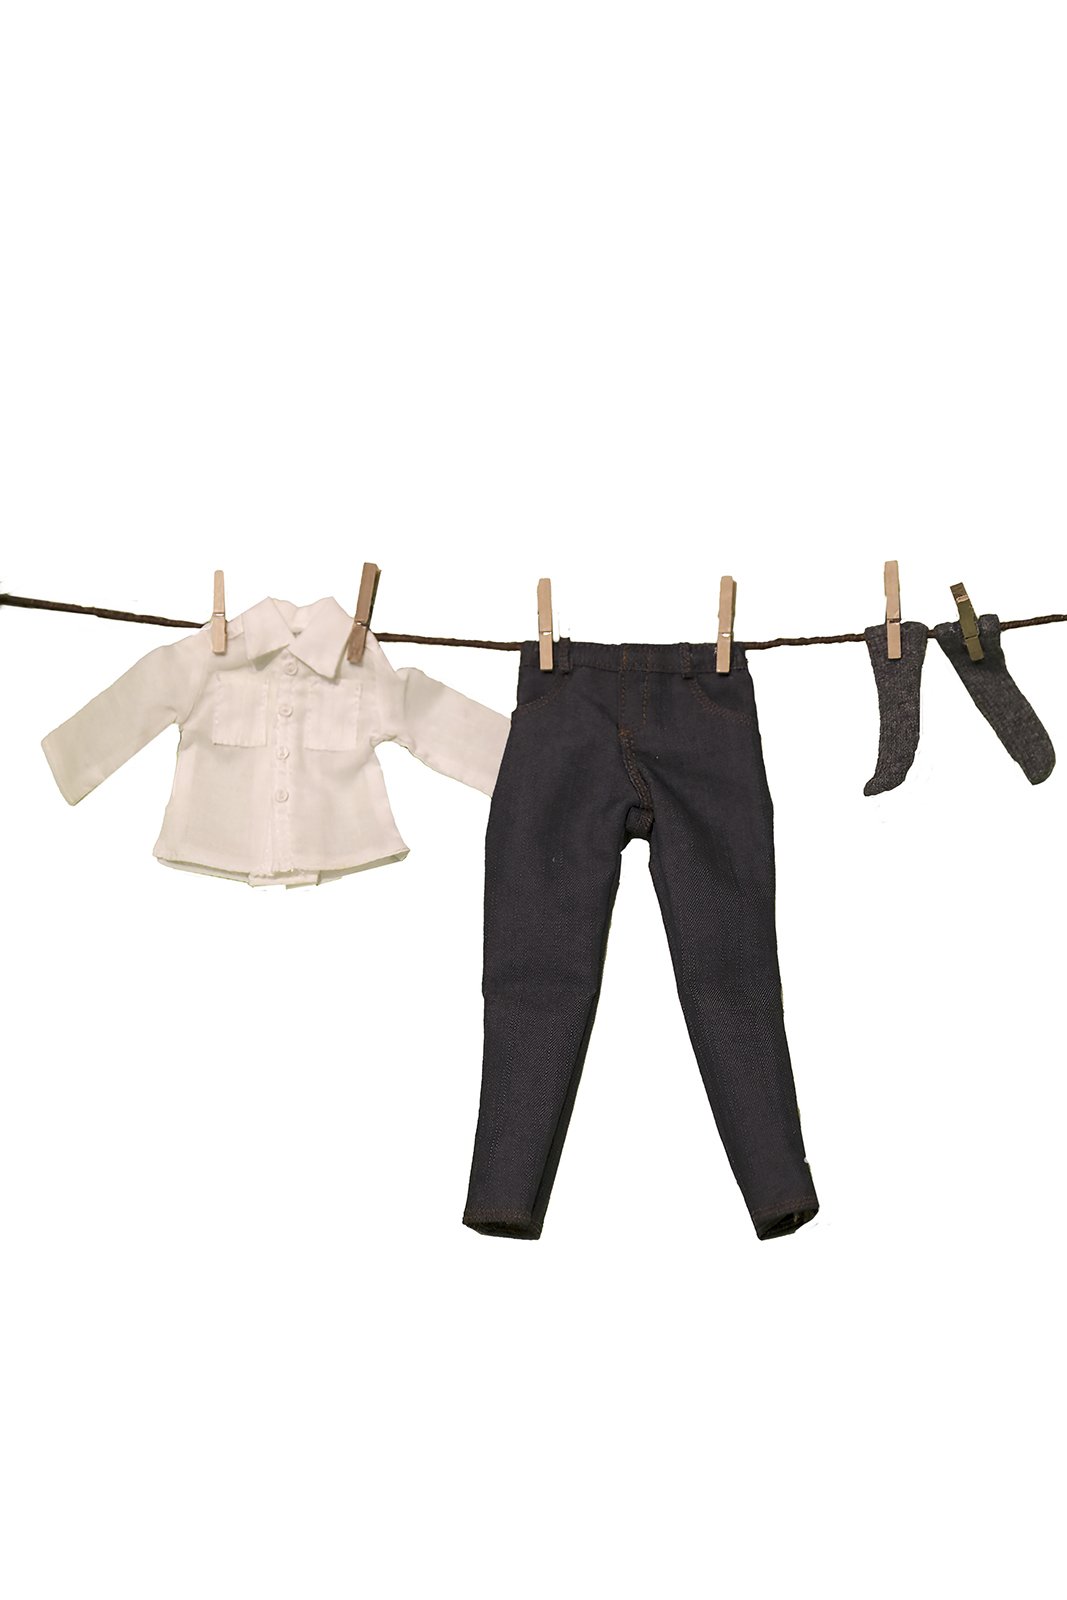
After cutting out an element, I place it in a designated "cut out folder". To keep my folders organized, I utilise Lightroom, where I have separate folders for various categories such as - trees, buildings, doors/windows, objects and so on, which contain cut-out images that are ready for use. Additionally, my "objects" folder contains unique and interesting finds, such as the clothes image shown. By using Lightroom I can view my stock library quickly, when I’m looking for inspiration.
Spending time is worth it
Getting your stock library organised, you will be surprised what you find in the “archives” that can be used for composite images
◼ Once you have found them never let them get lost again
◼ Cutting out those elements so they are ready to “rock and roll”
I try to do these things when:
◼ I don’t have any inspiration to create something
◼ Cutting out elements is also a mindless distraction for me but productive in the long run
◼ Keeps the creative thinking going, the number of times I have started to search through the photos or cut out an element and it has sparked an idea for me.
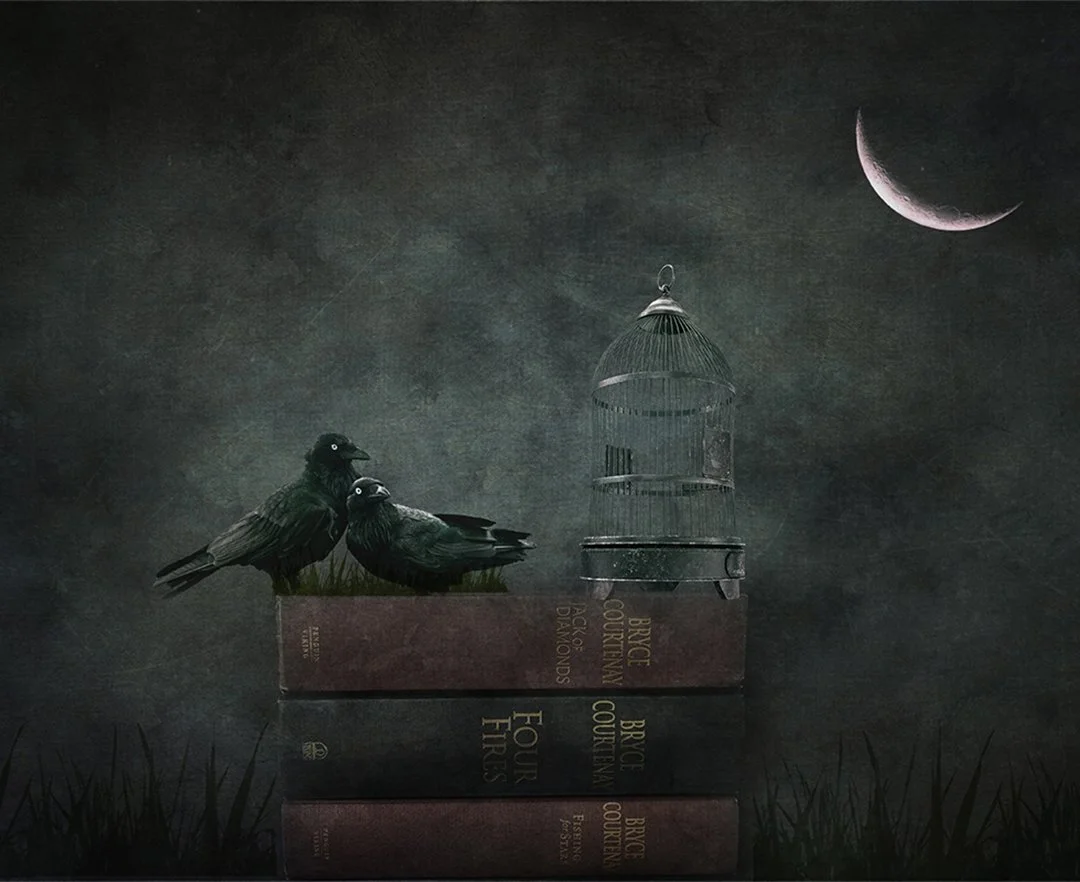
It started with 2 Crows …
This image started with me cutting out 2 crows, which ignited the "creative bug" and it went from there. I was in a creative rut, no ideas, couldn’t be bothered. So I went to “my go to” and decided to cut out the crows. It was fun and challenging!
Then I thought I have some books I photographed a while back, why not cut them out, then I thought I wonder what the crows would look like sitting on the book. I started with one of my Renaissance Fine Art Textures, added the cut out crows and books and I was off and running in a “creative thinking” moment.
I added the birdcage and the moon and grass and had fun creating this image. Thank you Charlie and Charlene (I’ve nick named the crows) all because of you I had fun. I also have saved them into my Bird Cut Out Stock Library to use again (why re invent the wheel).
Investing time has paid off
I have spent time organising and re organising my stock library, finding “hidden gems” and more importantly when I find something that I could use in a composite image, I cut it out and save it.
By doing some regular housekeeping, getting my tools organised has paid off. I don’t waste time trying to find images and cutting out before I even start my “creative” thinking. Of course, there are times I still have to search and cut out, but as I do this as a regular housekeeping task it has sped up the workflow of creating a composite image or art work for me.
My best tip is to have fun when creating a “composite image” let your imagination take you somewhere, look at those photo’s with fresh eyes, what is a boring photo of suitcases can now be used for a time when I need a “tin trunk”. I don’t have an idea at the moment, but it is waiting just for that moment when the “creative bug” taps me on the shoulder and now I can say I know just the element I can use if needed.
To excel in Composite Imagery using Photoshop, honing your Selection and Masking Techniques is essential. Although it may seem challenging initially, practice makes perfect, and the more you practice, the more you'll improve. This teaching tutorial is a good way to hone your skills, where I show you the basic techniques to start.