Behind the Layers Award Winning Image ~ Blog


Putting yourself out there
Entering competitions can be daunting, yet rewarding. Putting your work out there to be judged, dissected and critiqued has it’s benefits and can be disappointing at times. We have an emotional connection with our images, the judges don’t, they will make their mind up usually in the first 3 seconds of seeing it, a harsh reality.
What makes an Award Winning image, there is no magic formula, the one thing I have learnt to ask myself over time “what is different or unique about this image” I am entering.
This is still one of my favourite images and has done well in 3 Major Competitions, however it also has not got a placing in some competitions. The joy and sorrow of competition, but if you never try you never know.
From press the button on the camera to processing
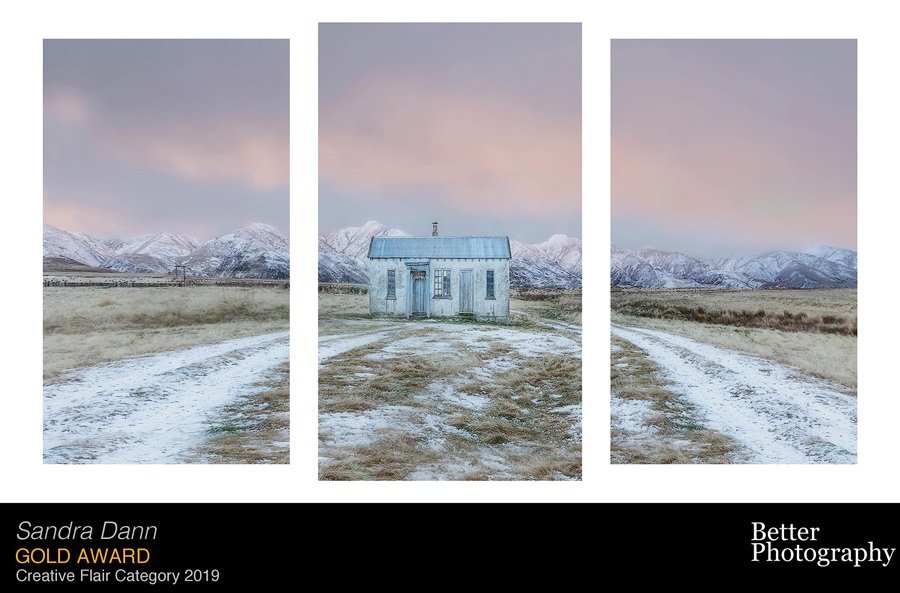
When I visited New Zealand in 2019 for some “me time” and “photography,” I had in mind a few locations and what I wanted to photograph. One location was the Manitou area, where I wanted to capture old huts. We arrived there after it had snowed, late afternoon and the light was soft.
It was one of those magical moments, when you know the landscape in front of you “has the bones” to create something special. We shot so many angles, close and from a distance. Sometimes when I am shooting, I am thinking of how I want to process the image. This time though it was more about getting the colour and tones right, capturing the mood, and all the elements played a part in this composition.
As the light began to fade, the sky lit up with soft colours—not behind the hut and mountains, but in the opposite direction—with soft hues of pink and blue. When the sky decides to put on a show, I’ll often capture it, even if it’s not the main scene. It gives me a reference to match tones and light from the same location when I’m processing the image later, much easier to match light this way.
My Thought Process

Base image i started with
When I looked at the image in Lightroom, I thought back to when I shot it and asked myself:
What was the dominant colour palette – cool or warm?
What was the feeling – cold, serene, peaceful, busy?
Who or what is the hero and the support act – hut, mountains, foreground, sky?
Workflow
Lightroom
I applied a pre-set I created (Remove Chromatic Aberration, Enable Profile Correction, straighten image and a few other tweaks). I often create presets for repetitive tasks.
Then I adjusted shadows, deleted dust spots and a few more adjustments to tweak the base image.
Having a structured process in the initial editing phase gives consistency in editing an image. (Read the blog on building a consistent workflow when starting out)
Photoshop
Again, I follow a structured process. I will do a colour correct layer if required (I felt this image had a blue colour cast), a levels adjustment to get my foundation set. I prefer levels instead of curves, everyone is different in their approach)
I can be a bit fussy with my foreground, so the next step was to “tidy up the messy bits” (eg removing unwanted objects in the foreground). I will scan the image and look for those unwanted bits and use the spot heal brush or patch tool to remove them. I got rid of the shed, plants and twigs, these elements weren’t part of the story for me)
I used several adjustment layers (Brightness and Contrast, Hue and Saturation, Curves (to add that touch of contrast) to get the light and colour to what I had in mind.
Extended the canvas on both sides to make the image a panorama.
Selected and duplicated the foreground where the road was and flipped it (horizontal) adjusted the size and placed it where I wanted. I used the Transform Tool (Ctrl T) to do this, the foreground then looked like there were 2 roads into the hut. That took some mastering to align the universe :)
Replaced the sky (the sky was taken from the same location) I added a Levels Clipping Mask to tone down the sky and make it appear softer and blend in with the image.
Next, I used Nik Collection to add a Soft-Focus filter to fine tune the colours, which added some contrast, then I dropped the opacity to soften the overall colour.
Fine tuning, I brushed in colour in various areas of the sky, this is a good technique to disguise some of the blown highlights.
I added a Coloured Tint (Tints can change the colours, add a boost to the colour palette, it depends on what look you are after.) I create my own now, so I can get the colour I am after. This one was a soft pastel tone to soften, yet add colour depth.
Then I used a plug-in for Photoshop that uses luminosity masks. This adjusts the midtones, shadows or highlights, depending on the image. I struggled with Luminosity Masking and this free plug in does it for me.
Some dodging and burning in areas to add light and shade.
The next steps were about getting my colour palette and tones to what I had in mind and what I saw that day. I used several Solid Colour Fills and used a Blend Mode (Soft Light) to give it a soft feel, a few more Nik Filter layers, Levels Adjustment Layer.
The final layers were about sharpening, noise reduction and I added an Orton effect.
Processing this image was a labour of love as it took over 40 layers before I got it to a point, I was happy. Some images I edit in 10 layers or less, others more – it depends on the image, what I am wanting to achieve and how creative I want to be.
I wanted something different. Why not see how it goes in a Triptych? Which is what I did, after tweaking the Triptych I thought – “it works” for my eye. We had lift off, I was happy with the end product.
For me creating an image is something I enjoy, although I do get frustrated at times. I get satisfaction in starting with an idea and going from there. It is trial and error, sometimes it just doesn’t work, and other times it all comes together.
The creation of this image started the moment I pressed the button on the camera, then through to how I wanted to process it, to end up with something I was happy with.
Winning Gold was a bonus for this moment in time.
